Saturday, January 29, 2011

Cake Order


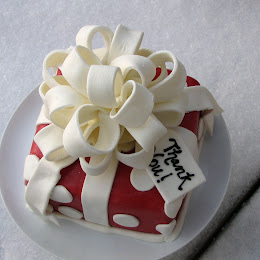
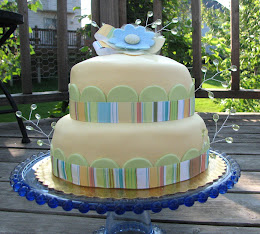
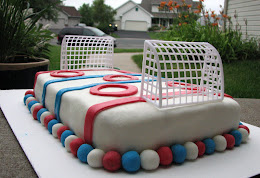
This is a cake I made for a friend's birthday last week. She brought me a photo of a cake ripped from a magazine and I just recreated the look for her.

The top present is a vanilla bean cake with lemon curd filling and lemon cream cheese icing - 4 layers. The bottom cake is a chocolate cake with bittersweet whipped chocolate ganache filling and a dark chocolate icing - 5 layers. The whole thing was wrapped and decorated with home-made marshmallow fondant.

Lori was nice enough to bring me a slice of the cake later this week (the cake was HUGE - and heavy). I shared my slice with Max and Calvin though I wanted to keep it all for myself. Yum! My photos are not the best as I finished the cake Sunday night which meant no natural light for these shots.

Recipe: Toffee Pecan Cookies


Calvin's teacher has been out for several weeks due to surgery. She came back to the classroom on Monday. Calvin came home that afternoon and told me that we had to make some really delicious cookie to bring to her. When I asked why, he told me that another little boy gave her some cookies that day and she told the boy that she loved him. "So I need to bring her even better cookies Mom!" Well, okay then. Clearly I have a little boy who needs a lot of affection.

These are the cookies we made and when I asked Calvin how it went he said "she told me she loved me more than that other boy (doubtful, but really adorable)." Mission accomplished.

2 1/4 cups all-purpose flour
1 tsp baking powder
1/4 tsp baking soda
3/4 tsp salt
3/4 cup unsalted butter, softened
3/4 cup granulated sugar
3/4 cup firmly packed light brown sugar
3 large eggs
2 tsp vanilla
2 cups English toffee bits, such as Skor or Heath
1 3/4 cups pecans, toasted and chopped

Position rack in the center of the oven and preheat the oven to 350 F. Line two baking sheets with aluminum foil and spray the foil with nonstick cooking spray.

Sift together the flour, baking powder, baking soda and salt into a medium bowl. Set aside.

In the bowl of an electric mixer, using the paddle attachment, beat the butter and sugars at medium-high speed until light, about 2 minutes. Beat in the eggs, one at a time, mixing well after each addition and scraping down the sides of the bowl as necessary. Beat in the vanilla extract. At this point the dough will look curdled. At low speed, add the flour mixture, mixing just until blended. Using a wooden spoon, stir in the toffee and pecans.

Drop the dough by rounded tablespoonfuls onto the prepared baking sheets, spacing the cookies 2 inches apart. Bake, one sheet at a time, for 14 minutes (I find it better to under-cook them), until the cookies are starting to turn golden brown around the edges. Let the cookies cool on the baking sheets for 2 minutes, then carefully transfer them to a wire rack and cool completely. Makes about 48 cookies.

Store in an airtight container at room temperature for up to a week.

Friday, January 28, 2011

Games to Get Kids to Eat Vegis


Yesterday at lunch we played "how many colors can you get into one bite of soup"? Chicken and Vegi soup with red, orange and yellow peppers, celery, corn, peas, mushrooms, bean sprouts and lots of zucchini. Calvin was eating mushrooms!!

Thursday, January 27, 2011

Snowman Craft #4


Rip paper, glue repeat.

Fancy Pantsy


Yesterday was "Fancy Nancy Day" at kindergarten. This is dapper little Calvin after school (if you look close you can see he has already spilled something on his tie - boys, sigh). Calvin's fancy word of the day was FABULOUS. We used it all day - you look fabulous, you are a fabulous eater, you made a fabulous picture, you are a fabulous kid . . . kindergarten is so adorable!


P.S. This jacket is really too small - it's coming your way cousin Soren!

Monday, January 24, 2011

Recipe: White Chocolate Chunk Fudge Cookies


Do you like how I follow up my squishy post with a recipe for chocolate cookies? I made these for a couple of missionary care packages and for the neighbor who has been driving Max to band on Wednesday mornings. I tripled the recipe and ended up with about 9 dozen cookies (bad idea because these are incredible and may just be my new favorite chocolate cookie)! I used the basic recipe from The Good Cookie cookbook and just added the milk chocolate chips.

3 oz. unsweetened chocolate chopped
2 oz. bittersweet Ghirardelli chocolate chopped
2 cups flour
1 t. baking soda
1/2 t. salt
11 T. unsalted butter at room temp
1 cup packed light brown sugar
3/4 c. plus 2 T. sugar
1 T. molasses
1 T. vanilla
2 large eggs at room temp
1/2 cup cocoa powder sifted
9 oz. good white chocolate chopped (Ghirardelli)
1 cup milk chocolate chips

Heat oven to 350. Melt the unsweetened and bittersweet chocolate together and stir until smooth (I used the microwave). Sift together dry ingredients. Whip butter and sugars until light and fluffy, add eggs one at a time and then vanilla, melted chocolates and molasses. Slowly add dry ingredients and then the white and milk chocolates. I used a med. cookie scoop, pushed each cookie down a bit and then baked these on silpats for 11 minutes. Keep the dough cool between batches. You want them to be a little underdone but cracked. Let cool a bit on the cookie sheet before transferring to a cooking rack. You will not be able to eat just one!

Thursday, January 20, 2011

On Being Less Squishy


So, it turns out there are consequences to eating a diet composed primarily of pies, cheesecakes and trifle washed down with eggnog from Thanksgiving to New Years as my squishy middle will attest (I gained 6 pounds). Clearly it is time to return to a healthy diet and stop pretending that having Nutella for breakfast is a good idea.

I made a big batch of this salad this week and have been eating it for lunch almost every day. It is my favorite salad because it stays crunchy for a long time (I can't handle wilty food . . . is wilty a word?). It has been difficult to dial down the sweets though it does feel good to not have a continual sugar headache. I've started back up at the gym after almost three weeks of holidays and sickness. Running hurts and so does getting up at 5:15 to go to the gym when it is -15 outside. Why do we live here?

Here's how you make this salad. Boil up some quinoa (the same way you boil rice - 2 parts water one part quinoa) and then spread it out on a cookie sheet to cool. I was making this salad for me and two other families so I made up a whole box. While that is cooling start chopping up vegis - celery, red, green and orange peppers, seedless cucumbers, jalapeƱos, bean sprouts . . . whatever you like. Throw them in a huge bowl with some corn and rinsed black beans. Add your quinoa and an entire bunch of chopped cilantro. Make a vinaigrette of red wine vinegar (2T), fresh lime juice (1/2 c.), olive oil (1/3 c.), cumin (2 t.) and salt and pepper to taste. I wanted this salad to have a little more heft, so I also cooked up some chicken breast with a little garlic and chopped that up as well. Mix together and chill. Yum!

Change


Somewhere in the last few blurry weeks, we fell into the New Year. Usually, I take the time to sit down and think about personal goals and family goals while making sparkling cider toasts with the children. I write them down and post them on the doors of our bedrooms for us to remember them throughout the year (this never works). This year 2011 arrived amid a flurry of runny noses, pounding headaches and painful coughs with little thought of personal goals other than to get well as soon as possible.

Many bloggers focus on a word for each year; a word that encompasses their goals and hopes for the New Year. My word is change. Often when I think of change, I imagine the negative. This year I hope to look on change as an adventure and an opportunity for growth.

2011 is going to be a year of many big changes for our family (I think I've said that before). This morning I took the kids down to my attorney's office and signed my divorce papers - again. I have now been separated for over 18 months and I hope that the end of this chapter is now at hand. It is time. It is past time.

Do you have a word for the year?

This Child


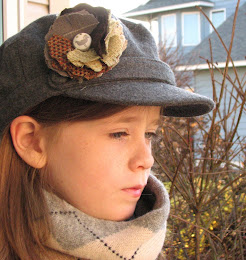
This morning, this child got dressed for school, came downstairs and decided it would be a great time to work on a clay modeling project. Ten minutes later she was covered from head to toe in wet clay - and so was the table and floor. Evidently getting older does not mean we make less of a mess. Darn.

On another note, I would like Sophie's Sunday outfit in my size please.

Friday, January 14, 2011

Snowman Craft #3


We are still making snowmen and it is still snowing outside.

Start by giving each child a piece of cardboard and have them paint it blue. I set out a tray with a lot of blue and a little white and black. Let dry.


Try to prevent the baby from looking like this.


In the meantime, cut three circles out of white paper for each child - each smaller than the last. I just used three lids and traced them. The older kids can do this by themselves.


Fold each circle in half three times and then cut out snowflakes.


Once all of the snowflakes are done, glue them on your cardboard to make the snowman.


Find some twigs if you want and glue them on as arms - I happened to have a box of sticks because I am weird that way.


Let dry and admire.

Wednesday, January 12, 2011

Recipe: Eggnog Cookies


There it is, the last of the eggnog. Actually it makes me my stomach a little ill to look at the photo - too much eggnog this season. Actually, I think it was too many sweets in general resulting in a three week sugar headache.

I needed a quick dessert to bring to a dinner last weekend and remembered seeing a recipe for eggnog cookies. They are very pretty baked - puffy and a lovely color. I'm not sure if I really liked them or not - I think I prefer my eggnog chilled in a glass. By the way, that is the only brand of store bought eggnog I can drink. I made the mistake of buying another brand at Target and made the kids drink it all. This recipe would probably be better with the full fat eggnog, but I just used what I had.


1 C. butter, softened
2 C. sugar
1 C. eggnog
1 t. baking soda
1/2 t. ground nutmeg (sometimes I put in little more)
5 1/2 C. flour

Beat butter and sugar until fluffy. Add eggnog, baking soda, and nutmeg, and mix well. Gradually add flour, mixing well. Divide dough in half; wrap in plastic. Chill overnight or 2 hrs. in freezer. On floured surface, roll out half of dough to 1/8-inch thickness. Cut out with flour dipped cookie cutters. Place 1 inch apart on ungreased baking sheets. Bake at 375 degrees for 8-10 minutes or until lightly browned. Cool completely, then ice and decorate.

Icing:
3 C. confectioners' sugar
1/4 C. butter, softened
1/3 C. eggnog

Beat the confectioners' sugar and softened butter until well blended. Gradually beat in eggnog until icing is smooth.

True confessions: I did not roll these out - too much trouble. I just refrigerated the dough for a bit, rolled them into balls and squashed them with my palm.

Snowman Craft #2


It is blessedly quiet right now. The baby is sleeping, six kids are at school and the rest are sledding right outside the window. Ah, peace and quiet. I should be cleaning the kitchen floor from lunch but I did that yesterday - and every day for the last 10years. The floor can wait.

I suspect I have about 20 minutes before the kids outside realize it is freezing today and start pounding on the door begging for hot chocolate.

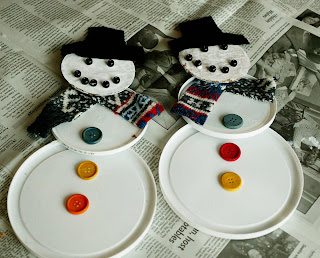
Snowmen #2 this afternoon. Another pretty simple craft using recycled materials.

Start by giving each child a cardboard circle - or a lid - whatever. If it is cardboard, have them paint it white.


Create a face on the circle using glue. give each child some black beads to stick to the dots of glue. You could also use black beans or a marker.


Next, let each child choose two more lids - larger than your first circle. Put two blobs of glue on one and one blob of glue on the other and give the kids some buttons.


Set everything aside to dry. At this point, I found an old sweater than had shrunk in the wash and cut out scarves. Have the children cut black hats out of felt.


You should now have all of these parts. Pull out the hot glue gun (which means the baby is done crafting) and start gluing the parts together. Attach the scarf first and then just overlap the circles slightly and adhere with a lot of glue. The end.